


 中文简体
 English
 한국어
 日本語
 русский
 Español
 عربى
Industry News
Home / News / Industry News / Broil Like a Pro: Indoor Broiling, Electric Grill Pans, and ODM Buying Tips
Oct 19, 2026
Content
Pull a one-inch ribeye out from under a 550°F broiler after four minutes and you get a dark, blistered crust with a pink center. Leave it under there for seven minutes and you get a grey steak, a greasy oven floor, and a kitchen full of haze. Broiling is the fastest dry-heat method in a home kitchen, and it is also the least forgiving one: the gap between perfect and ruined is measured in thirty-second increments, and every rule around it traces back to one fact, which is that the heat arrives from above the food rather than below it.
The short answer first: broiling works when three variables line up. The food sits at the right distance from the element, the cooking surface stays somewhere above roughly 450°F, and the fat that renders out has somewhere to go other than the air in the room. Miss any one of those three and you get smoke, steam, or an overcooked grey band underneath the crust. Hit all three and you can broil salmon fillets, chicken thighs, peppers, or cheese-topped toast in under ten minutes with almost nothing to scrub afterwards.
We build countertop cooking appliances for a living. Victor Electric Appliance Technology Co., Ltd. (Ningbo Victor Electrical Technology Co., Ltd.) has been developing and manufacturing kitchen appliances since 2019, with an indoor electric smokeless grill pan line, a double-sided lift grill, magnesium alloy cookware, and a wider range that includes waffle makers, steamers, and coffee machines. Roughly 60% of what leaves our floor is exported, and the average production lead time on a confirmed order runs about 45 days. The broiling questions that reach us from buyers and end users almost always come back to the same three variables described above, which is why this article treats them as the structure rather than as an afterthought.
In North America, broil describes radiant heat coming from an element or flame positioned above the food. In the United Kingdom, Ireland, Australia, and New Zealand, the identical process is called grilling, which is why a British recipe that says "grill for six minutes" and an American recipe that says "broil for six minutes" are asking for the same thing. What Americans call grilling, cooking on a grate over a heat source below the food, is referred to as a barbecue or a grill in most other English-speaking markets. This vocabulary collision causes real friction in product documentation: a single instruction sheet written for several markets has to define its terms, or buyers end up testing the wrong function and comparing results that were never comparable in the first place.
Mechanically, a broiler element does two jobs at once. It heats the air inside the cavity, and it radiates energy directly onto the surface of the food. Air is a weak heat carrier, which is why baking at 350°F takes twenty to forty minutes while broiling at 550°F browns a surface in three. The radiant portion does most of the work, and because radiant energy travels in straight lines from a glowing element, the top of the food cooks considerably faster than the bottom. That single fact explains nearly every practical broiling rule in circulation: flip the food, keep it thin, raise it or lower it on the rack, or switch to a method that delivers heat from both directions.
The table below places broil next to the other high-heat methods a home cook is likely to weigh on a weeknight, along with the trade-offs that come with each.
| Method | How heat reaches the food | Typical temperature | Best suited to | Main drawback |
|---|---|---|---|---|
| Broil | Radiant heat from above, plus hot cavity air | 500-550°F at the element | Thin cuts, fish, vegetables, melted toppings | Smokes quickly, top surface browns far ahead of the center |
| Bake | Surrounding hot air with some radiant contribution | 325-375°F | Casseroles, cakes, whole birds, slow browning | Slow, and surfaces dry out before they colour |
| Pan sear | Conduction through direct metal contact from below | 400-450°F pan surface | Steaks, cutlets, sliced vegetables | Grease splatter, one side at a time, oil smoke indoors |
| Air fry | Forced convection with a high-speed fan | 350-400°F | Frozen items, small batches, reheating | Limited batch size, edges dry out before centers cook |
| Indoor electric grill pan | Contact with a ribbed plate plus radiant warmth from the plate | Adjustable, roughly 176-450°F | Two to four portions indoors, everyday grilling | Depends on drip management and plate temperature control |
The pattern in that comparison is worth noting for anyone specifying a product. Broiling is the only common method where heat direction, rather than heat quantity, determines the outcome. A pan that delivers 400°F from below and a broiler that delivers 400°F measured at the surface of the food will produce visibly different results on the same steak, because one works through direct contact and the other works through radiation and reflection.
Once the direction of heat is fixed, three variables do almost all of the remaining work. They interact, so changing one usually means adjusting another, but they can be handled in a predictable order.
Radiant intensity drops quickly as the gap grows. In practice, that means a steak placed three inches under a 550°F element will form a crust in three to four minutes per side, while the same steak placed six inches down will brown unevenly, lose moisture for longer, and finish with a paler, tougher surface. Thin items such as shrimp, sliced vegetables, or a piece of fish with the skin on do best at two to three inches, because they need fast surface heat and their centers cook through before the crust can burn. Thicker items, a two-inch pork chop or a bone-in chicken thigh, sit better at four to five inches so the interior has time to reach temperature without the top turning black.
A broiler set to high usually peaks around 500-550°F, and a low broil setting sits nearer 450°F. Those figures describe the element, not the air, and not the food. Because most residential broilers cycle on and off to hold their setting, the average air temperature in the cavity during a broil is meaningfully lower than the peak number on the dial. That is why preheating for five to ten minutes matters: a cold cavity drags the whole cook into the baking range, and the surface never gets hot enough to brown before the interior overcooks. A useful test is to sprinkle a pinch of flour or a drop of oil on a metal pan placed on the top rack. It should darken in seconds, not minutes.
Time under a broiler is a poor guide on its own, because it depends on the first two levers. Internal temperature is the reliable checkpoint. Salmon pulls at 125-135°F, a one-inch ribeye at 130-135°F for medium rare, boneless chicken thighs at 175°F, and sausages at 160°F. The practical habit is to start checking a full two minutes earlier than instinct suggests, because broiling finishes fast and there is no way to reverse a grey band once it has formed.
The cheat sheet below combines all three levers into starting points that can be adjusted for a particular oven or appliance.
| Food | Typical thickness | Distance from element | Approximate broil time | Target internal temperature |
|---|---|---|---|---|
| Salmon fillet | 1 inch | 3 inches | 8-10 minutes, no flip | 125-135°F |
| Ribeye steak | 1 inch | 3-4 inches | 3-4 minutes per side | 130-135°F |
| Boneless chicken thigh | 1 inch | 4-5 inches | 5-6 minutes per side | 175°F |
| Shrimp, peeled | Under 1 inch | 3-4 inches | 2-3 minutes per side | Opaque and firm, around 120°F |
| Sliced bell peppers | About 0.5 inch | 4 inches | 10-12 minutes, stir once | Tender with charred edges |
| Cheese-topped toast | 0.5-0.75 inch | 4 inches | 2-4 minutes | Melted and bubbling |
| Sausages | 1 inch | 4 inches | 10-12 minutes, turning twice | 160°F |
Notice how the times cluster between two and twelve minutes. Broiling is not a slow method, and the entire cooking window for a single portion is often shorter than the preheat. Any appliance designed to reproduce this behaviour on a countertop has to reach a working temperature quickly and hold it, which is the design problem behind the electric grill pans discussed later in this article.
Smoke is rarely caused by the food itself. It is caused by fat reaching its smoke point on a surface that is hot enough to keep it there, and by fine droplets of rendered fat landing on a 550°F element. Fat that drips into a cool pan and solidifies produces almost no visible smoke, while the same volume of fat hitting a glowing element produces an aerosol that spreads through the whole room in seconds. The chart below compares the smoke points of fats commonly used in a kitchen against the working temperatures a broiler and a countertop grill plate can reach.
The numbers explain a great deal about why indoor grilling products have evolved the way they have. Butter and extra virgin olive oil both break down well below the temperature a broiler element reaches, so a cook who brushes a steak with either and slides it under a high broiler is creating smoke within seconds regardless of how the food is positioned. Refined oils with high smoke points behave better, but the more important factor is where the fat ends up: on a hot surface it keeps smoking, while in a drip tray it simply cools.
This is the design logic behind the indoor electric smokeless grill pans in our range. The ribbed plate carries the heat, the gaps between the ribs let renderings fall away from the cooking surface, and a removable tray below collects them at a temperature low enough that they stop producing aerosol. A variable temperature control adds a second layer of control, because a cook can hold the plate near 400°F for bacon or sliced vegetables instead of pushing a surface toward 500°F and chasing the smoke point of every fat on the menu.
Ventilation still matters, and no countertop appliance replaces a properly sized range hood in a commercial setting. What a well-designed indoor grill pan changes is the volume of smoke produced in the first place, which is often the difference between a usable apartment kitchen and one where the alarm goes off every time someone cooks a burger.
An indoor electric grill pan reproduces part of the broiling experience without needing an oven at all. The heating element is bonded to or mounted beneath a ribbed plate, so the food cooks through direct contact on the ridges and through reflected heat in the gaps. A drip tray underneath catches renderings, and an adjustable thermostat lets the cook hold a chosen surface temperature rather than accepting a fixed setting. Preheat typically takes three to five minutes, which is faster than most ovens reach broil temperature, and the whole cook happens in one vessel instead of on a rack over a sheet pan that will need scrubbing later.
The large-format indoor electric smokeless grill pan with a removable grill is the model that suits a family or a shared kitchen, where four portions of chicken, sliced peppers, and a couple of skewers need to cook in one go without crowding. The removable plate is the detail that decides whether the appliance gets used on a Tuesday night or stays in the cupboard: a pan that has to be wiped down and dried while still hot is a pan that people avoid. When the plate lifts out and goes into the sink or the dishwasher, the after-dinner effort drops to roughly a minute.
The smaller indoor electric barbecue grill pan with temperature control serves a different user. It covers one or two portions, fits a narrow countertop or a small balcony table, and the thermostat gives a cook fine control over a narrower surface, which is useful for fish, halloumi, or a single thick steak where a large plate would waste heat on empty space. Both models share the same principle: keep the working surface in a controlled band, give the renderings a path away from the food, and make cleaning something that takes less time than the cooking did.
For anyone replacing oven broiling with a countertop appliance, the practical trade-off is worth stating plainly. A broiler reaches a higher peak surface temperature and produces a harder crust on a thick steak. A countertop grill pan gives up some of that peak heat in exchange for adjustability, a smaller footprint, and far less smoke. For fish, vegetables, thin cuts, sandwiches, and everyday weeknight cooking, the exchange usually works in the cook's favour.
The biggest structural weakness of broiling is that it only heats one side. A lift grill solves that by adding a second heated plate above the food, so a single cooking cycle browns both surfaces without a flip. The distance between the two plates is usually adjustable, which means the same appliance can press a panini flat, rest lightly on a thick burger patty, or sit open in a flat configuration and behave like a conventional countertop griddle.
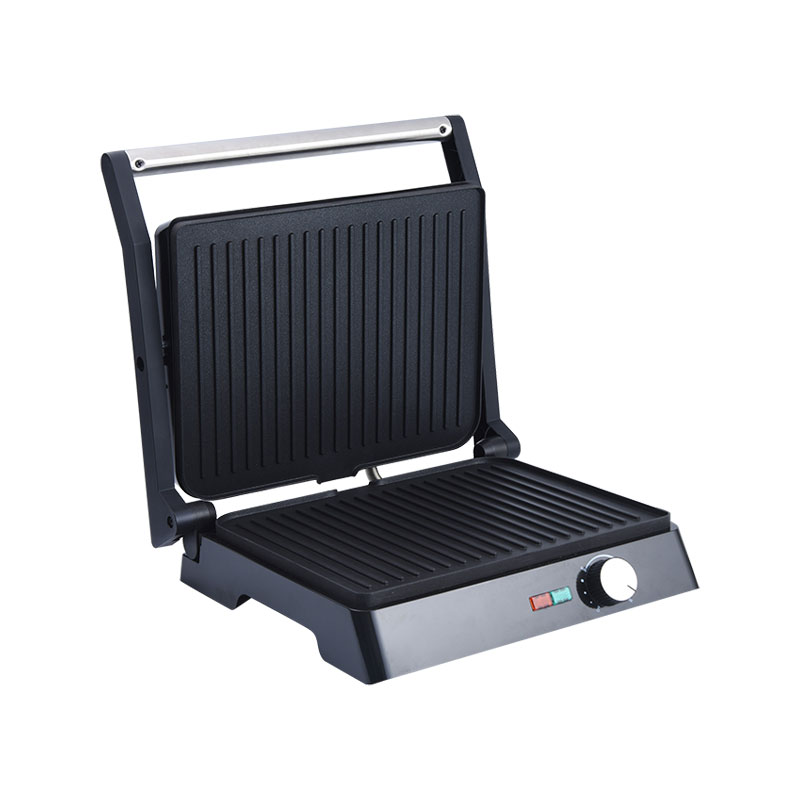 Double-Sided Lift Grill with Adjustable Upper PlateThis double-sided lift grill heats both sides at once, adjusts to thicker foods, and opens flat for pancakes, eggs, or vegetables; upper and lower temperatures are independently controlled.View Product →
That height adjustment is more useful than it first appears. A fixed-height contact grill crushes anything thicker than the gap it was built around, which is why so many of them end up unused. A lifting top plate accommodates food of different thicknesses, keeps the upper surface in contact without compressing it, and lets a cook open the unit flat when they want a broader cooking area for pancakes, eggs, or a batch of sliced vegetables. For buyers planning a product line, this is also the feature that separates a single-purpose sandwich press from a general countertop cooking appliance that can carry a higher price point.
Used together with an indoor smokeless grill pan, a lift grill covers most of what a household broiler does, minus the peak radiant heat and the smoke. One handles flat, open cooking with a drip path; the other handles two-sided contact cooking with an adjustable gap. Between them, a small kitchen can produce a broiled-style crust on a steak, a grilled sandwich, and a tray of charred peppers without ever turning on the oven.
Cookware material decides how quickly heat spreads across a plate and how much the plate weighs when someone has to lift it. Magnesium alloy sits in an interesting position between aluminium and steel on both measures. Its thermal conductivity is around 156 W/m·K, lower than aluminium at roughly 205 W/m·K but far above carbon steel at about 43 W/m·K and stainless steel at around 16 W/m·K. Its density is about 1.74 g/cm³, against 2.70 g/cm³ for aluminium and 7.85 g/cm³ for steel.
The practical consequences are easy to describe. A 30 cm magnesium alloy grill pan weighs noticeably less than the same pan in cast aluminium, which matters for anyone who has to lift a loaded pan off a counter with one hand or pour off fat at the end of a cook. The lower thermal mass compared with steel means the pan reaches working temperature faster, though it also cools faster once the heat is removed, which is why temperature control on the appliance matters as much as the alloy itself. A magnesium alloy surface also spreads heat more evenly than a thin steel plate, reducing the hot spots that cause one end of a strip of bacon to burn while the other end is still pale.
We use this material in three products: a magnesium alloy electric baking pan, a magnesium alloy grill pan, and a magnesium alloy pot. Each is a cooking vessel rather than a component, and each depends on the same casting and finishing capability that sits behind our separate mould and parts processing service, where aluminium alloy component processing, magnesium-aluminium alloy mould processing, and semi-solid magnesium alloy component processing are offered to industrial customers. That overlap is deliberate. A manufacturer that can cast and machine its own plates holds tighter tolerances on plate flatness, wall thickness, and rib geometry than one that buys finished plates from an outside supplier and assembles around them.
For cooks, the takeaway is simpler. A magnesium alloy pan combined with an adjustable heat source gives a light, responsive cooking surface that heats quickly and holds a set temperature well, which is exactly the behaviour needed when the goal is a broiled-style crust without a 550°F oven.
Once the differences are clear, method selection becomes mechanical rather than intuitive. A short decision list helps more than a long explanation.
Most households end up with two of these methods rather than all five, and the pairing that covers the widest range is a lift grill plus a flat grill pan. The one combination that reliably disappoints is a single fixed-temperature contact grill, because it forces every recipe into one thickness and one heat level.
For importers, wholesalers, and brand owners, the specification sheet is where a product succeeds or fails, long before the first container ships. Appliances that look identical in a catalogue can differ by hundreds of watts, several millimetres of plate thickness, and a coating system that decides whether the surface survives two years of daily use. As an ODM and OEM manufacturer working with overseas brand owners, we see the same handful of specification gaps come up in quotation rounds again and again.
| Specification | Common range or option | Why it matters in the market |
|---|---|---|
| Rated power | 1200-2200 W for countertop units | Determines heat-up speed and how quickly a plate recovers after cold food is added |
| Voltage and plug | 110-120 V or 220-240 V, with regional plug types | A single model can serve several markets only if the electrical configuration is planned early |
| Plate temperature range | Roughly 176-450°F (80-230°C) on adjustable models | A wider usable band covers both low-and-slow items and high-heat grilling |
| Plate material and thickness | Die-cast aluminium or magnesium alloy, generally 3-6 mm | Thicker plates resist warping and hold temperature better under repeated cycles |
| Surface coating | PTFE or ceramic systems, PFOA-free declarations | Coating adhesion is the most common warranty complaint in this category |
| Drip tray | Removable, typically 200-400 ml capacity | Capacity and positioning decide how much smoke the unit produces in normal use |
| Plate removability | Fixed or fully removable | Drives the cleaning story, which is a major factor in retail reviews |
| Timer and safety cut-off | 30-120 minute timers, thermal fuse, auto shut-off | Required for several markets and expected by most retail buyers |
| Certification scope | CE, ETL or UL, RoHS, and food-contact testing such as LFGB or FDA | Certification determines which channels a model can enter at all |
| Packaging validation | Internal drop test and standard transit testing | Damage rates in transit affect returns far more than most buyers expect |
| Lead time | Approximately 45 days average for confirmed orders | Shorter quoted times carry more risk than they usually save |
The specification items that generate the most discussion during sampling are usually plate thickness and coating system, because both affect cost directly and neither shows up in a photograph. A three-millimetre plate and a five-millimetre plate can look the same in a product listing while behaving very differently after a hundred heating cycles. Buyers who test their own samples through repeated heat-up and cool-down cycles before committing to a container tend to catch that difference early, when changing the specification is still inexpensive.
Language also deserves attention. If a model is sold into both the United States and the United Kingdom, the instruction manual needs a clear glossary for "broil" and "grill", preferably with a diagram showing the direction of heat. Manuals that skip this step generate support tickets, and support tickets turn into returns.
We built our product development cycle around the idea that a new model should be tested to the point of failure before it reaches a customer. Since 2019 the company has added models in stages: two waffle maker designs in 2021, two indoor smokeless grill pan products in 2022, two steamers in 2023, and two coffee machine platforms more recently, with capacity growth tracked alongside. Each of those launches carried the same testing sequence, and the sequence is worth describing because it is the part of manufacturing that buyers cannot see in a sample.
The company's manufacturing operation, automation investments, and quality system sit behind those steps, and the details are documented on our manufacturing page for buyers who want to see how the process is organised before placing a first order. The numbers that matter most to a purchasing team are straightforward: about 60% of production is exported, the average lead time on a confirmed order is roughly 45 days, and each new platform is developed with its own tooling rather than adapted from a shared chassis.
Testing is also where the broil-style performance of a grill pan gets defined for a specific market. A model intended for a European kitchen may be tuned to hold 430°F for searing, while a model aimed at a market with smaller countertops and lighter cooking habits may be tuned to reach the same crust at a slightly lower surface temperature over a longer time. Both are valid; what matters is that the specification sheet and the actual behaviour of the unit agree.
Baking surrounds the food with hot air at a moderate temperature, usually between 325°F and 375°F, and cooks it slowly from all directions. Broiling applies radiant heat from an element above the food at roughly 500-550°F, so the top surface browns in minutes while the interior cooks through more gradually. Baking suits anything that needs to cook evenly through, and broiling suits thin foods that need a fast, dark surface.
In the United Kingdom, Ireland, Australia, and New Zealand, grilling means exactly what broiling means in North America: heat from above. In the United States, grilling usually refers to cooking on a grate over a heat source from below. This is why appliance manuals sold across markets should define both terms rather than assuming they are understood.
Most residential broilers reach a peak element temperature of about 500-550°F on high and around 450°F on low. Because the element cycles on and off, the average cavity temperature during cooking is lower than the peak figure. Preheating for five to ten minutes brings the cavity close to its working range before the food goes in.
An electric grill pan does not produce the same peak radiant heat as an oven broiler, but it can deliver a comparable surface result on thin and medium-thickness foods. The ribbed plate provides direct contact heat, the gaps provide a drainage path, and an adjustable thermostat keeps the surface in a useful band. For fish, vegetables, sandwiches, and cuts up to about an inch thick, the result is close enough that most cooks do not miss the oven overhead.
Trim excess surface fat, avoid low smoke point fats such as butter and extra virgin olive oil at high heat, place the food on a rack above a drip pan rather than directly on a flat tray, add a thin layer of water or a small amount of liquid to the pan beneath the rack, and select the lowest broil setting that still produces the crust you want. If the smoke persists, the fat is reaching its smoke point on a hot surface, and the fix is relocation rather than seasoning.
Two to three inches for thin items that cook through quickly, and four to five inches for thicker cuts that need time for the centre to reach temperature without burning the surface. The exact gap depends on the element output, so the practical test is the crust: if the top darkens before the interior is close, move the rack down one position.
Anything very thick that needs even cooking throughout, such as a whole chicken or a large roast, is better baked first and broiled briefly at the end for colour. Foods with high sugar glazes also burn quickly under direct radiant heat and usually need a lower rack position or a shorter exposure. Delicate items that dry out, such as thin white fish without skin, benefit from a light oil coating and a shorter cook.
Purchasing teams generally focus on plate material and thickness, coating system and adhesion test results, thermostat accuracy across the full range, drip tray design, electrical configuration for each target market, certification scope, and a reliable quoted lead time. Samples tested through repeated heating cycles reveal more about long-term performance than any specification sheet, and an ODM or OEM partner with in-house casting capability can usually adjust plate geometry and tolerance more quickly when a market requires a different cooking behaviour.
Broiling rewards preparation more than technique. Preheat the cavity, place the food at a distance that matches its thickness, keep the fat moving away from the heat, and stop cooking on internal temperature rather than on the clock. Do those four things and a weeknight dinner can go from refrigerator to plate in under fifteen minutes with a crust that a pan on a stovetop struggles to match.
When an oven broiler is not available or a kitchen cannot tolerate the smoke, a countertop appliance with a controllable plate and a drip path covers most of the same ground. That is the problem our indoor electric smokeless grill pans, double-sided lift grill, and magnesium alloy cookware were designed to solve, and it is a problem worth solving properly, since the alternative is a household that stops cooking the foods it actually enjoys.
If you want to go deeper into how indoor grilling compares with traditional outdoor methods, our background article on the design and behaviour of smokeless grills covers the airflow and drainage principles in more detail.
Follow our social media to learn more about our updates


+86-13805815092

No. 11 Beihai Road, Xinqi Street, Beilun District, Ningbo City, Zhejiang Province, China
